Donnie's Little Solenoid Helper...
Which Harley-Davidson motorcycles will this work on?
Donnie's Little Solenoid Helper (or the DLSH, as it's been called) works on all Evo model Harley-Davidsons with short primary covers (usually isolation-mount engines). This includes the FXR and FLH family of motorcycles.
Most excellent features of the DLSH.
2. No special tools required (You will need a drill - a drill press is better. I used a hand-held drill for mine.)
3. It installs in about an hour
4. No special skills required (except for drill skills.<:^)
5. Long lasting. My DLSH has been installed on my '89 FXR since 1995 and is still going strong as of this writing.
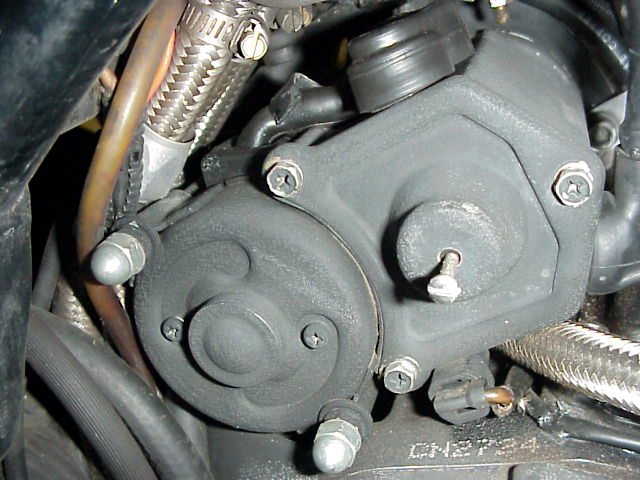
Picture 1.
Picture 2.
Okay, let the games begin:
Step 1. VERY IMPORTANT!!
First thing to do is remove the chrome solenoid cover (2 nuts - easy to do). This should be an oval-shaped cover, NOT a round cover. If your cover is round, you have an older model and this solution may not work for you. Unfortunately I forgot to take a picture of the chrome cover, which is buried in my shed in a box-o-parts.
Picture 1 is of the starter/solenoid with the chrome cover already removed and the DLSH already installed. Please note the rogue screw popping out of the center of the solenoid. This is the "solenoid helper." This is an ordinary screw from a light switch. If you know an electrician, he probably has a dozen of these lying around.
Here are the parts you'll need: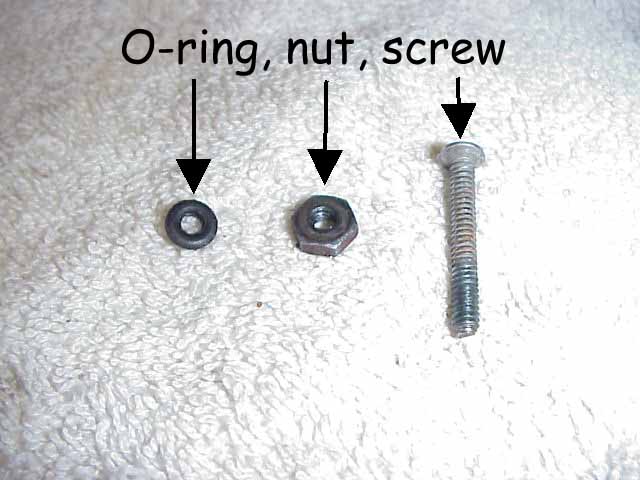
I recommend you use the same "light switch" screw I used.
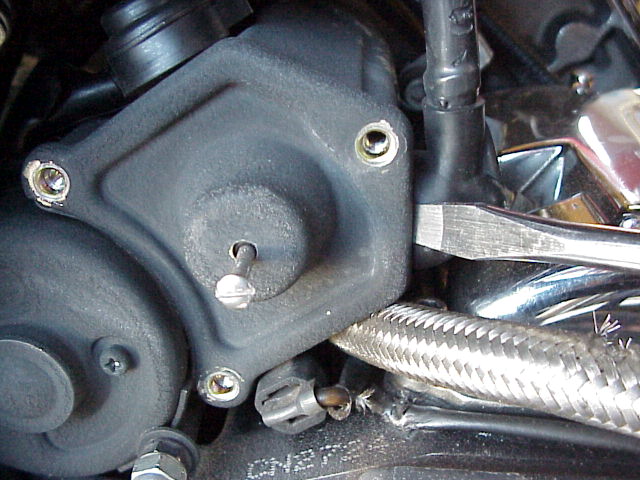
Step 2. Remove the solenoid cover. Unscrew the 3 phillips-head screws (which also don 8mm hex heads). My cover had been on for many years and thousands of miles, yet I was able to remove it fairly easily. However if your cover is stuck, you can gently pry the cover off using a screwdriver. Be careful not to puncture the rubber boot (See picture 4).
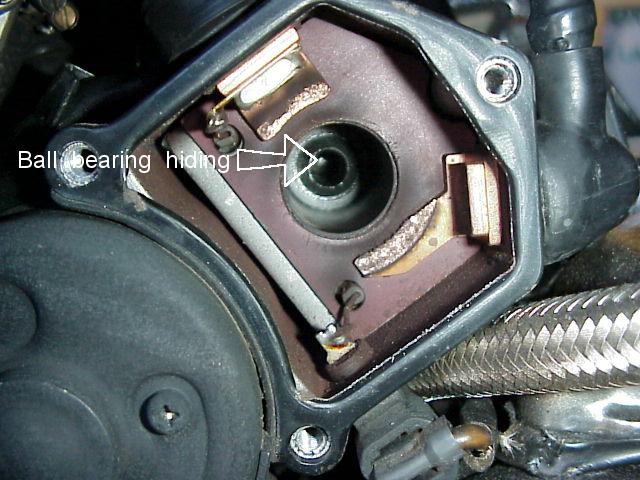
Generally speaking, if your bike is on its side-stand (which I imagine it will be), gravity will keep the bearing in its home. However the bearing may stick to the spring via grease, so be careful. Have a towel under yer scoot to catch the bearing should he try to escape.
Take the plunger assembly and set it aside (Picture 5). Be careful, as the spring slides off the back of the plunger assmebly. We will work on the plunger when we're done with the solenoid cover.
Picture 5
Picture 6
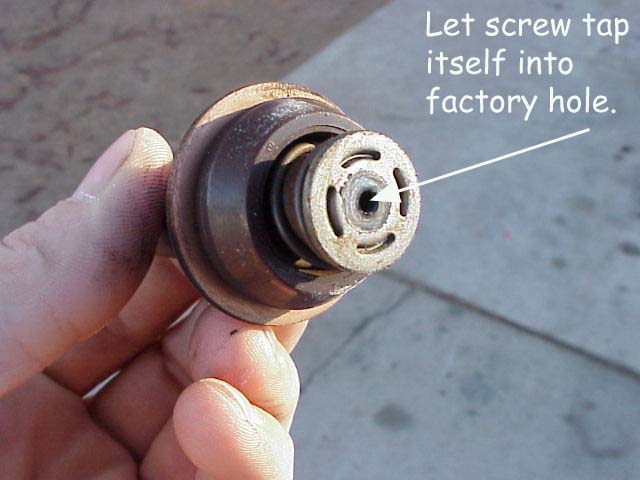
Step 4. Use your screw to tap into plunger hole. Because the material is copper, you won't need a tap. I have heard from other riders that their plunger didn't have a hole. If your plunger assembly lacks a hole, you will have to drill one. If you look at picture 5, you can see the hole in the top of my plunger assembly.
Once you have screwed your screw into the plunger, back it out and move on to the next step. Step 5 is optional, however I recommend doing it.
Step 5. Servicing the plunger: Your plunger has a copper washer that occasionally requires cleaning. (See Picture 7) Notice how dirty and pitted the copper washer is? Despite the dirty, pitted copper washer, my bike started flawlessly. However because I already had the plunger assmebly removed, I cleaned it up. You should do the same.
Picture 7
(Picture 8)
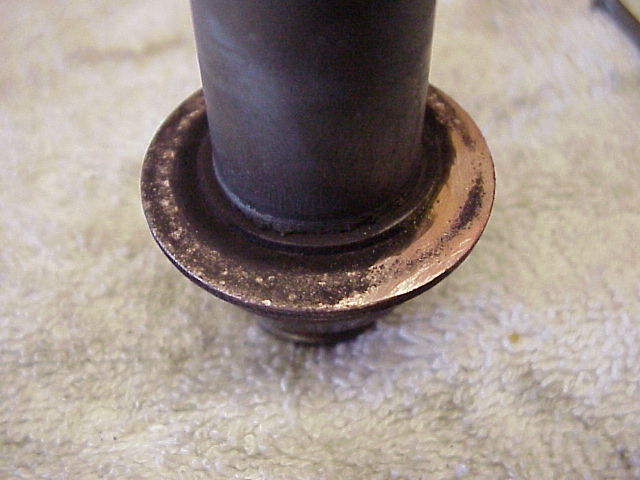
See the difference filing makes. (Picture 9)
Picture 10
Picture 11
Add the 0-ring. (Picture 12)
Add the nut over the 0-ring. (Picture 13)
Picture 14
Picture 15
Before you reconnect the negative terminal, push and pull the DLSH screw in and out a couple times. Make sure it moves freely inside the solenoid cover. If not, you'll have to disassemble and get things lined up. If it's close enough, just keep pushing in and out a few times so the screw wallows out the hole. I had to do this when I first installed my DLSH.
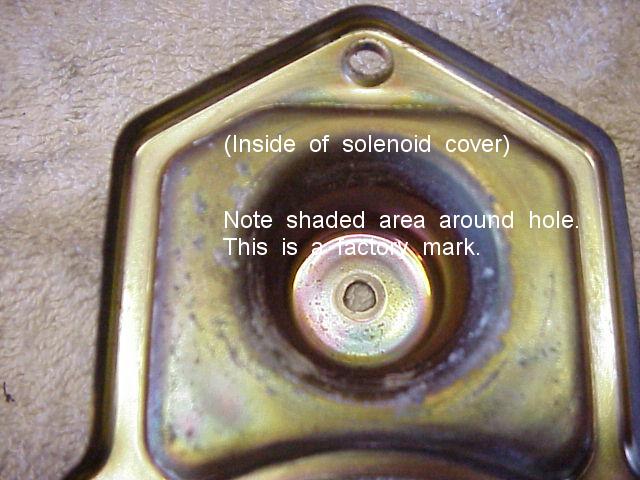
Step 3. You must now drill a hole exactly in the center of the solenoid cover. Fortunately for us H-D was nice enough to index the exact center of the cover with a shaded area. Drilling this hole is the hardest part of our process. If you have no drill skills (or no drill for that matter), you might want to have a friend help you. For best results start with a small bit (I recommend 1/16") and work your way up to the actual hole size. Unfortunately, I don't remember what size drill bit I used to finish (1/8"???). Size a bit next to the screw to see what you need. Remember that too small a hole is easier to correct than too large a hole. So start with the small bit and work your way up. Another benefit of starting with an undersized bit is if your initial hole is slightly off-center, you might be able to re-center your hole with a larger bit. (See picture 6)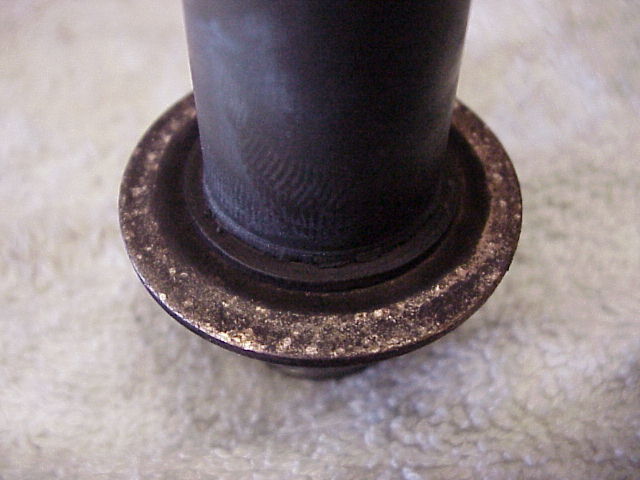
Use a mill file like this one. The copper is very soft, so it cleans up fairly easily. Don't over file.
Here's the finished product. Pretty neat, eh? This took about 60 seconds to complete. (See Picture 10)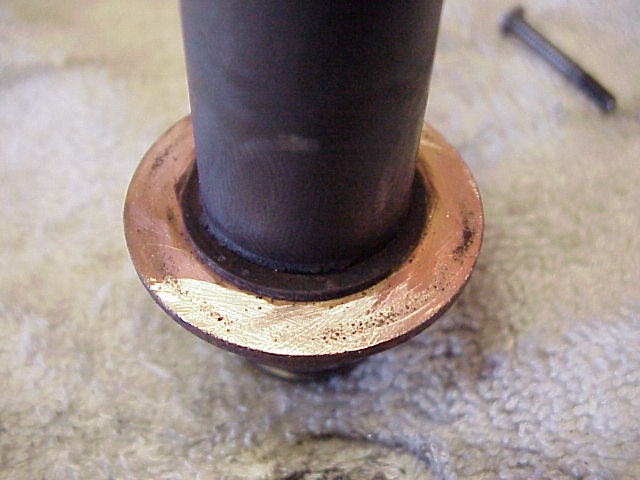
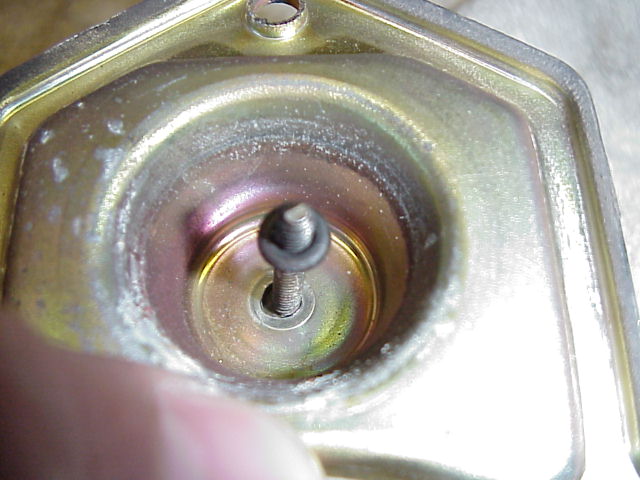
Step 6. Assembly and installation: Now insert the screw into the drilled solenoid cover. (See Picture 11)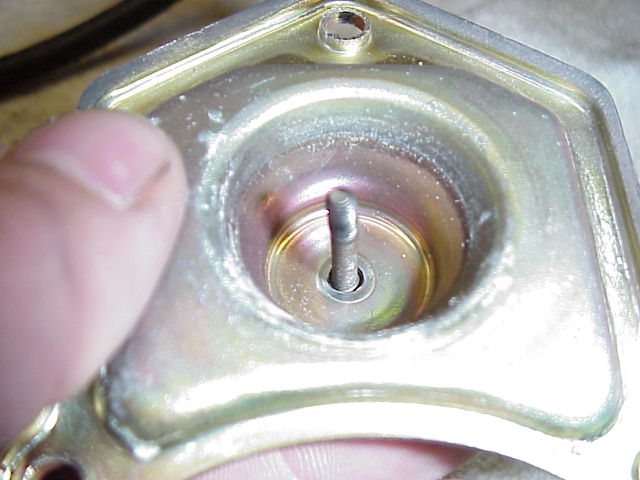
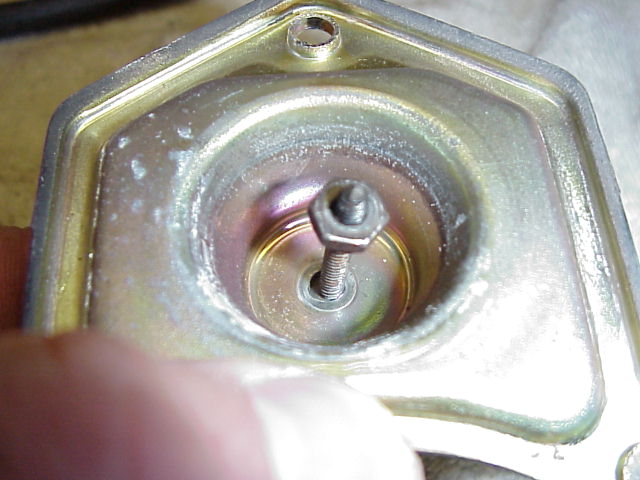
Screw the nut down onto the screw so that there's about 7/8" of screw sticking out of solenoid cover (nut is on the inside of the solenoid cover away from view - See Picture 14). Once you adjusted the nut so that the screw protrudes 7/8", you will then screw the screw into the plunger assembly (Picture 15).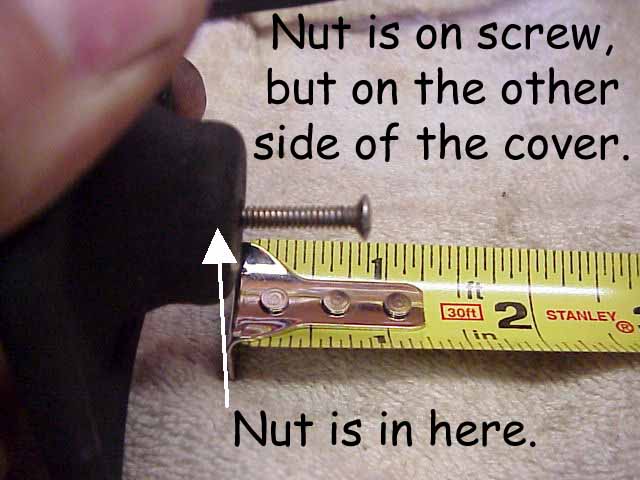
Now tighten the nut down snug towards the plunger. Be careful to maintain proper adjustment (amount of screw that is sticking out of the solenoid cover). Also please remember that the plunger is made of copper (a soft material), so you don't want to go ballistic with tightening the nut. It's not hard to get to the nut if you raise the solenoid cover up to the screw head and then tilt it like this: (See Picture 15) Double check to make sure 7/8" of screw is sticking out of the solenoid cover like in picture 14.
Now you are ready to reassemble!! Just replace the plunger assembly back into the solenoid along with the cover and tighten the 3 phillips/8mm screws. You're almost done!
Note: With the negative terminal still disconnected, when you push the DLSH in, it may feel like the plunger is sort of half stuck inside the solenoid. This is normal. Don't worry about it. This is because there's no power to the solenoid "return coil," so the jackshaft is sort of stuck half engaged. This is no big deal and will not cause damage or problems.
Second test: Reconnect the negative terminal to the battery, but don't tighten the pinch screw, as you may have to remove the negative terminal quickly. With the ignition off, but with the key in the ignition and your hand on the key, push the DLSH screw in. It's kind of hard to push, so you might wanna wear gloves. When you push it in all the way, the starter should engage and therefore turn the engine. If the starter doesn't engage, the screw is not sticking far enough out of the solenoid cover and must be re-adjusted. If your screw is adjusted out all the way and still not allowing the copper washer to make contact with the copper contacts inside the solenoid, then you need to replace your DLSH screw with a longer screw.
IF FOR SOME REASON THE STARTER DOESN'T DISENGAGE, DON'T PANIC! Just remove the negative terminal from the battery or turn on the key so the bike starts. Your bike will either start and the starter will disengage, or your bike won't start, but the starter will disengage anyway. I've only seen the DLSH get stuck once and that was because I didn't wallow out the hole enough during the initial installation, so the screw got hung up in the solenoid cover hole - lesson learned.
Once you have the solenoid cover hole wallowed out enough to where the DLSH screw moves freely in and out, the DLSH should be ready for use! The DLSH should give you years of reliable service. Mine has been in place and working perfectly for 17 years as of this writing.
Here are some of the peripheral benefits of the DLSH:
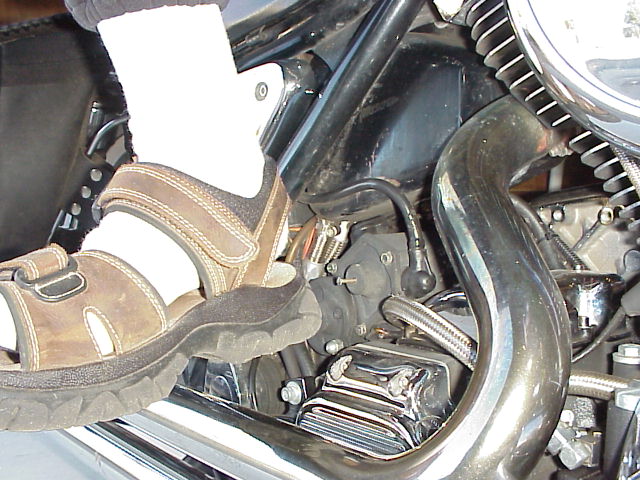
1: As a solenoid helper: If you depress your starter button and all you get is a click, while still holding down the starter button, just give the DLSH a GENTLE tap with your foot or, if you're off the bike, with your finger. (See Picture 16) This will "help" the solenoid to engage. This is how I use mine every day.
Picture 16
2: Using the DLSH on its own without using the starter button. Yes, you can use the DLSH without the use of the start button. This means that the DLSH will also work if there is catastrophic failure of your solenoid, starter switch, relay, or any of the wiring involved with the aforementioned peripherals. Even with a completely failed solenoid, a bad switch, and/or bad wiring, you can still start yer scoot using the DLSH!
3: With the ignition off, you can use the DLSH to bump your engine. This can be useful for finding timing marks, etc.
4: Helping along a low battery If your battery is near failure, you can use the DLSH on its own without the use of the starter button. Since you have eliminated the solenoid from the equation, this will allow extra current to be allocated to your starter motor. The solenoid draws a lot of current, so this is real-world savings that may allow your bike to start when it otherwise wouldn't.
Epilogue...
If Murphy's Law has come into play and your solenoid now works perfectly, you can "egg on" solenoid failure by turning on your headlights and ignition for like 5 minutes (maybe longer). When the battery voltage drops enough, the solenoid will fail, guaranteed. You can then do the "foot test" like shown above.
I hope this document facilitates a flawless installation of the DLSH for whomever reads it. If you have any questions, please feel free to e'mail me at donnie@swcp.com.
Good luck!
This page is up as of May 8, 2005 - 3:10 PM. This page was revised June 15, 2012 - 12:45 PM.
Page was widened to be wide-screen friendly. Will now look funny on low-resolution monitors. Also changed e'mail address.
If you have any questions, comments or suggestions, please

e'mail me.

All pictures & material Copyright © 2005 Donnie Frank
